Shifting an Ubuntu Install from HDD to SSD
I purchased a computer a while back and installed Ubuntu on the HDD. Everything was cool until I noticed a Slickdeal on SSDs and had to purchase a ~460gb drive.
This was last year. I’d been meaning to switch my booting to the SSD, but never got around to it. After all, I leave the PC on pretty much 24/7.
Then I started playing with some stuff and decided I wanted to decrease disk IOs, so tonight I moved my installation from HDD to SSD. It was a little involved so I figured it might be nice to document it here for future reference.
How to Copy an Ubuntu Installation from HDD to SDD
A general outline is as follows:
- Erase the SSD, and ensure it is large enough to fit your entire ubuntu installation.
- Partition the SSD so as to mirror the HDD. In my case, I had to create a
GPTpartition table using GParted, add an ext4 partition for my actual files, and a swap partition. - Boot into a live linux install, mount the drives,
rsyncthe necessary files. - Restore grub bootloader using a series of arcane commands.
- Modify fstab and some other files-I’d-never-had-figured-out-myself to point to your new drive.
- Restart ubuntu, run a command so hibernate still works.
- Profit.
I took a bunch of tips from this post.
Note on EFI
So my machine, being from 2014/2015, uses an EFI bootloader. If you don’t know your basic PC stuff, it’s just the layer between your OS and the hardware/firmware.
Older machines use an IBM standard you may have heard of called BIOS.
This is notable because if your machine is older and you’re using bios, the instructions below may be slightly incorrect for your case. More on EFI & bootloaders here.
Erase and Partition the SSD
Making sure your drive is set up correctly is the first step. I used GParted mostly because it comes preinstalled with Ubuntu (including live varieties) and because it’s been around since literally forever and is great.
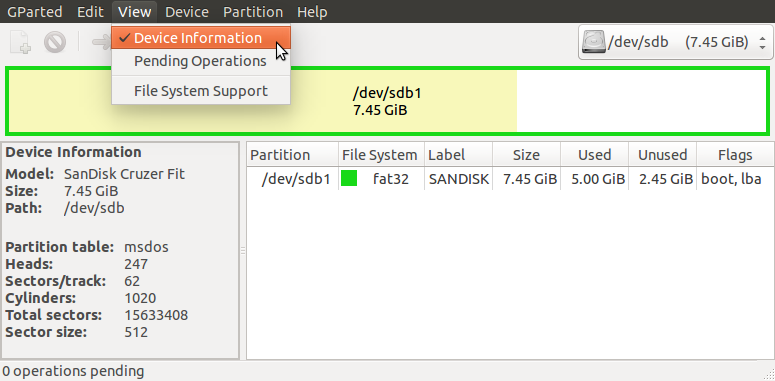
When you open GParted, you can see what partition table type your SSD has. Mine was msdos until I erased the SSD and recreated the partition table to match my HDD drive; I made it a GPT partition table.
Viewing your current partition table type in Gparted:
Creating a new partition table in GParted:

Take note of where your devices are detected. My HDD was detected at /dev/sda, and my SSD was detected at /dev/sdb. If you’re a newbie, one thing to remember is that *nix represents everything as file descriptors. So devices are all under /dev/*, and when mounted they’re usually represented in /mnt or /mount or /media.
Partitions to your devices then, are generally in order. /dev/sda1 refers then to my HDD’s first partition, which in my case happened to be an EFI boot partition. /dev/sda2 refers to my HDD’s second partition, an ext4 partition holding all my data, and /dev/sda3 refers to my swap partition.
Since presumably you’ve configured your SSD to mirror this setup, the partitions are probably at something like /dev/sdb1, /dev/sdb2, and /dev/sdb3.
Mount and rsync your files
Next I shut down and booted into a live USB of Ubuntu 16.06. Opening a terminal, I ran the following commands:
# Create mount directories
sudo mkdir /mnt/hdd /mnt/ssd /mnt/hdd_boot /mnt/ssd_boot

# Mount the ext4 partitions for my drives
sudo mount /dev/sda2 /mnt/hdd
sudo mount /dev/sdb2 /mnt/ssd

# Mount the EFI boot partitions for my drives
sudo mount /dev/sda1 /mnt/hdd_boot
sudo mount /dev/sdb1 /mnt/ssd_boot

# Copy the files from hdd into ssd, exactly.
sudo rsync -av /mnt/hdd/ /mnt/ssd/
sudo rsync -av /mnt/hdd_boot/ /mnt/ssd_boot/
Cool. Now I open GParted and for /dev/sda1 I unset the boot flag. For /dev/sdb1 I set the boot flag.
We’re not done. There are some things we need to do.
# Get the globally unique identifiers for each partition, and copy them somewhere (email to yourself?)
sudo blkid /dev/sda1
sudo blkid /dev/sda2
sudo blkid /dev/sda3
sudo blkid /dev/sdb1
sudo blkid /dev/sdb2
sudo blkid /dev/sdb3

# Install vim, because it's not included by default in ubuntu live? (wtf?) If you're a newbie replace vim with `nano`.
sudo apt-get install vim

# Modify fstab for the ssd
sudo vim /mnt/ssd/etc/fstab
In the /etc/fstab file you’ll see UUIDs (a globally unique identifier). For each, see which one of your devices it matches (it will be one of the UUIDs for a partition on your HDD), then replace it with the corresponding one for your SSD. In my case there were (3) UUIDs, corresponding to /dev/sda1, /dev/sda2, and /dev/sda3. I replaced them with their corresponding /dev/sdb* UUIDs.
Do the same in the following file:
sudo vim /mnt/ssd/etc/initramfs-tools/conf.d/resume
Restore GRUB
First unmount your ssd’s EFI partition (but not the ext4 partition).
sudo umount /mnt/ssd_boot
Then re-mount it within /mnt/ssd/boot/efi!
sudo mount /dev/sdb1 /mnt/ssd/boot/efi
OK now install this required grub efi package:
sudo apt-get install grub-efi-amd64
…and finally run grub-install.
sudo grub-install --boot-directory /mnt/ssd/boot /dev/sdb1
When this is done, try booting. If you get an error about secure boot though…you’ll start trying to find out what it’s all about, and hate eveything.
Dealing with the secure boot error
I really don’t care why secure boot exists or why it breaks my stupid install. I just want to fix it. So I found the easiest thing to do: boot to an ubuntu live instance, then install and run boot-repair. Use “advanced options” and choose the correct device to boot from as the default (in my case, /dev/sdb2).
In the live ubuntu environment:
sudo add-apt-repository ppa:yannubuntu/boot-repair
sudo apt-get update

# Installs, then runs boot repair right away.
sudo apt-get install -y boot-repair && boot-repair
Click “advanced options” and make sure you set exactly what’s needed. When it’s done, reboot and it should all work.
Final Notes
After you reboot your hibernate function will break. Run the following:
sudo update-initramfs -k all -u
Now you’re done for real.